
Using Tokens with User Pools
Authenticate users and grant access to resources with tokens. Tokens have claims, which are pieces of information about the user. The ID token contains claims about the identity of the authenticated user, such as name and email. The Access token contains claims about the authenticated user, a list of the user’s groups, and a list of scopes.
Amazon Cognito also has tokens that you can use to get new tokens or revoke existing tokens. Refresh a token to retrieve a new ID and access tokens. Revoke a token to revoke user access that is allowed by refresh tokens.
Authenticating with tokens
When a user signs into your app, Amazon Cognito verifies the login information. If the login is successful, Amazon Cognito creates a session and returns an ID, access, and refresh token for the authenticated user. You can use the tokens to grant your users access to your own server-side resources or to the Amazon API Gateway. Or you can exchange them for temporary AWS credentials to access other AWS services.
Using the ID Token
The ID token is a JSON Web Token (JWT) that contains claims about the identity of the authenticated user such as name, email, and phone_number. You can use this identity information inside your application. The ID token can also be used to authenticate users to your resource servers or server applications. You can also use an ID token outside of the application with your web API operations. In those cases, you must verify the signature of the ID token before you can trust any claims inside the ID token.
Using the Access Token
The user pool access token contains claims about the authenticated user, a list of the user’s groups, and a list of scopes. The purpose of the access token is to authorize API operations in the context of the user in the user pool. For example, you can use the access token to grant your user access to add, change, or delete user attributes.
The access token is represented as a JSON Web Token (JWT). The header for the access token has the same structure as the ID token. However, the key ID (kid) is different because different keys are used to sign ID tokens and access tokens. As with the ID token, you must first verify the signature of the access token in your web APIs before you can trust any of its claims.
AWS Cognito User Pools
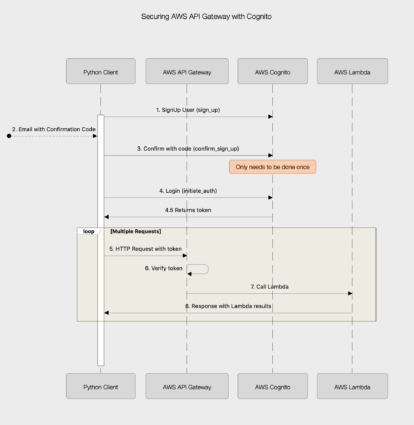
Source: Securing AWS API Gateway with Cognito User Pools
An AWS Serverless web application allows you to build and run applications and services but leaves the server management to AWS. This lets you focus on your application code instead of worrying about provisioning, configuring, and managing servers.
When you build the AWS Serverless web app, there are a number of moving parts and sometimes putting all of those parts together can be confusing. In this post, we will focus on securing AWS API Gateway endpoints using Cognito User Pools using a simple Python client to call the endpoints. After we understand how to secure the API Gateway endpoints, we can then add DynamoDB and a Web client that uses the Amplify Javascript framework.
Background
This tutorial will show you how to create an AWS Cognito User Pool to allow people to signup with their email address as their username and a password. Cognito confirms the registration by sending the user a code to the email address proved during sign-in, that the person will have to pass along to Cognito.
After the user has been confirmed, they are able to log in with their username/password and Cognito will return a token that is valid for 1 hour. The token can then be used in the header of HTTP Post requests to AWS API Gateway, which will be configured to use the Cognito User Pool as an authorizer. Without a valid token, the API gateway will reject any requests. With a valid token, the API gateway will pass the request through to a Lambda function that will decode the token to determine the user.
Once we understand this much, we can then build upon it to include a Web UI that uses the Amplify Javascript library to replace the Python client, and also include DynamoDB to store the request using the email address as the key.
Use Case
The use-case we will use is a simple note minder application. Once a user is signed up they will be able to post notes.
Assumptions
To follow along with this tutorial, it is assumed you have an AWS Account with sufficient permissions to create the resources outlined in this post.
Source Code
Full source code can be found on my Github page.
Creating A Cognito User Pool
Amazon Cognito provides for User Pools and Identity Pools. Identity Pools provide temporary AWS credentials that allow users access to actual AWS Services; for example, if you wanted to grant someone access directly to a DynamoDB table. This is not what we want in our case. User Pools provide the mechanism for people to sign up and confirm an account. Once confirmed the user can login and get an access token used to authenticate the API against.
Keep in mind that User Pools are meant to authenticate users – but not authorize which services they have access to. The authorization is what Identity Pools help with or the application can craft their own service authorization scheme.
For our example, we are going to allow users to signup for a user account. Cognito user pools have options that allow for self sign up or manually adding users or federating the authentication to an OAuth provider such as Facebook or Google.
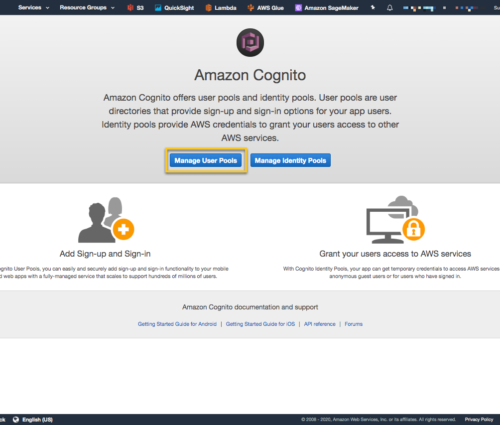
Log into your AWS Account and go to the Cognito Service and select “Manage User Pools.” On the next page select “Create a user pool” button on the upper right.
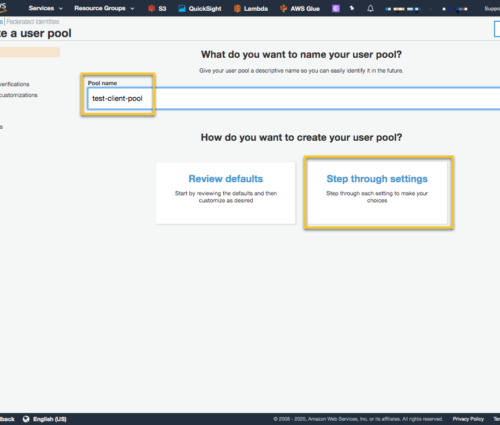
Give the pool a name and select the ‘Step through settings’.
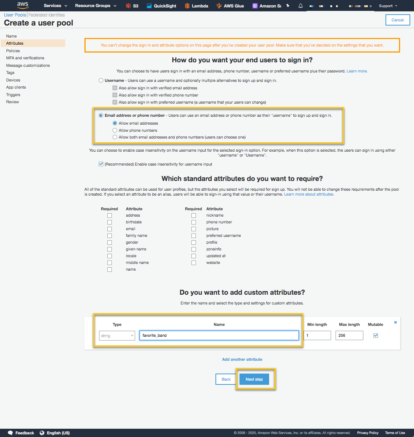
The next page allows us to define attributes of the Cognito User Pool such as how to login, and any custom fields. I am going to add a custom field so we can see how that is handled. Also select ‘Email address or phone number’ to sign up. When done, select ‘Next Step’.
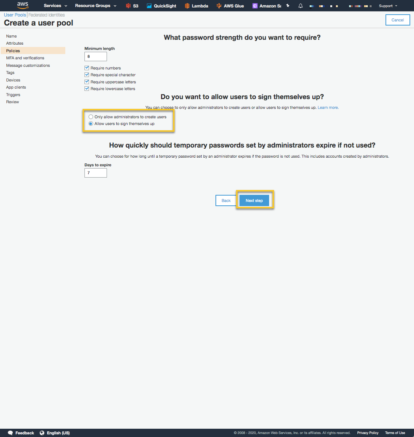
The next page is the Policies page, which lets you to set up password policies and select whether you want users to sign themselves up. In our case we do. Select ‘Allow user to sign themselves up’. When done select ‘Next Step’.
The next page lets you setup MFA and other verification options. This page also lets you create a role that allows Cognito to send SMS messages. Leave all of the defaults and select ‘Next step’.
The next page lets you customize the signup messages. Leave all of the defaults for this page and select ‘Next step’.
On the ‘Tags’ page, create any tags that your organization requires. Select ‘Next step’ to move to the Devices page. Leave the default of ‘No’ – meaning we do not want to remember any user device.
The next page is the ‘App client’ page. We do want to create an App client, so that our Python client application can interact with Cognito.
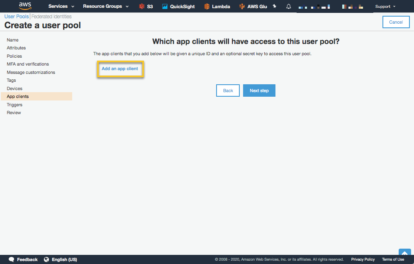
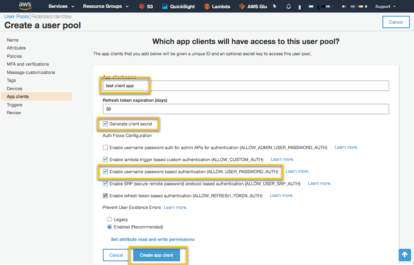
Next, we request client secrets to be created. When we create the Web application we won’t need client secrets, but we do for a Python client using the boto3 API. Enable username/password authentication. Select ‘Create app client’.
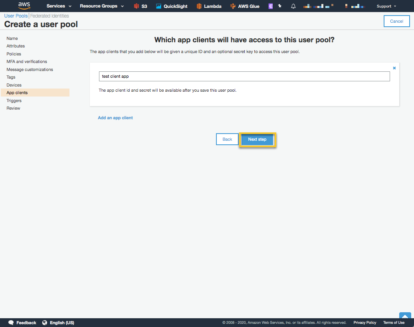
Then select ‘Next Step’.
We are not going to be setting up any triggers so select ‘Next Step’ on the triggers page. Triggers allow you to insert your Lambda code into numerous places in the Cognito workflow.
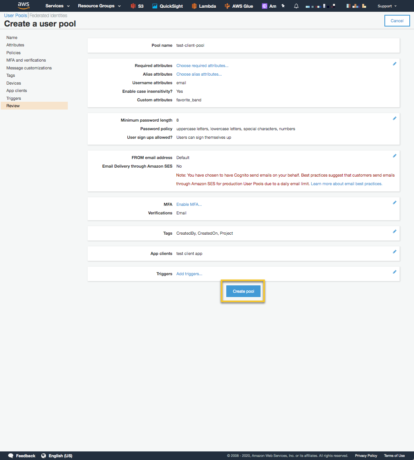
Review the settings and if it looks good select, ‘Create pool’.
It seems like a lot; but after you create a few, the process is very fast. Imagine having to create this functionality yourself and you being to realize the power of Cognito.
At this point you now have a User Pool that is ready for users to signup and get credentials for logging in.
If you were creating a web application, this is where you would use Amplifyjs and start to craft your web application. In the interest of keeping things simpler, I am going to create a Python client using the boto3 API to interact with Cognito. Once we understand the interaction, I will add a web interface to signup and login.
Cognito Interaction with a Python client
Let’s first look at the overall interaction.
Cognito boto3 client
The python client we will be writing uses the ‘cognate-idp’ boto client. Getting access to the client using an AWS profile looks like:
session = boto3.Session(profile_name=aws_profile_name)
client = session.client('cognito-idp')
SignUp
The first step is allow someone to signup for an account and get a confirmation code. The Python boto3 API. For this example let’s assume the user needs to provide their email address as their username, a password and we also want them to provide their full name and their favorite band.
The sign_up interaction looks like the following:
The cognito client needs the ClientId and a SecretHash which requires the ClientSecret. For the implementation of the ‘get_secret_hash’ function, see the Github repo’s Jupyter notebook.
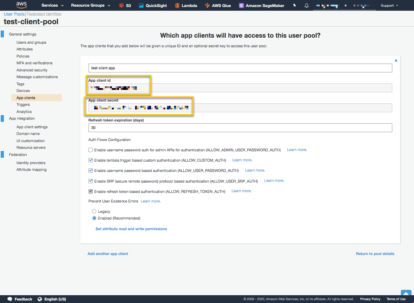
You can find the client information in the AWS Cognito Console. Select the User Pool and then ‘App clients’.

Select the ‘Show Details’ and you will see the Client Id and the Client Secret. I saved these to my local project in a .env file.
Calling the ‘sign_up’ method will add an unconfirmed entry to the User Pool.
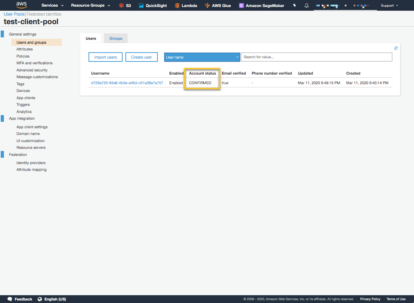
cognito_signup(email, password, "Ernest T Bass", "Cotton Eyed Joe")
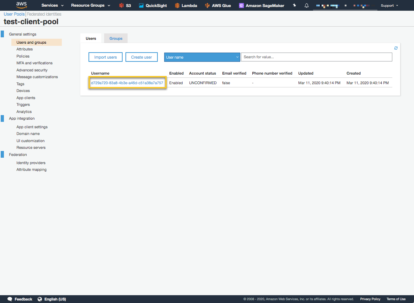
First we can see that the account status is ‘Unconfirmed’. This is because an email was sent to the email address with a code that has to be sent to Cognito. You can see in the User Pool the information about this particular user. Trying to login with the username/password will result in a ‘client.exceptions.UserNotConfirmedException’ being thrown.
Confirm Sign Up
To confirm a sign up, retrieve the confirmation code from the email and we will call the ‘confirm_sign_up’ method of the Cognito client.
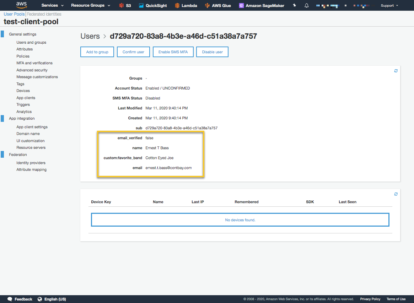
Notice on line 4, we use the email address as the username and line 5 is where we pass in the confirmation code. Once confirmed, verify in the AWS Cognito Console
This takes care of flows; 1,2,3 in the sequence diagram above. We are now ready to login with the users email and password.
Login
The boto3 Cognito client has a method called, ‘initiate_auth’. Because earlier we selected the setting that allows a user to login, this method can be called by the user. The reason login is required is to get a time sensitive JWT token that can be used when we call AWS API Gateway endpoints that are secured with the same Cognito User Pool. We will see how to do that a little later.
The login method looks like the following:
The AuthFlow has to be specified as ‘USER_PASSWORD_AUTH’. There are a number of different Authentication flows, this one allows for the typical username/password authentication.
The response from a successful login, is a json document with a number of elements. The one holding the Token is in AuthenticationResult->IdToken.
IdToken = resp['AuthenticationResult']['IdToken']
With the IdToken we have completed flows 4 and 4.5 in the sequence diagram above and we are now ready to configure and access the API Gateway to forward requests on to a Lambda function.
We will need the Lambda function setup before we setup the API Gateway so we will look at the Lambda setup next.
Lambda Setup
Since this post is really about securing API Gateway endpoints with Cognito, we are not going to spend a lot of time on the Lambda function. The GitHub repo as the code for the lambda function and a script to generate the zip file distribution.
Be sure to change the Handler to:
add_note_lambda.lambda_handler
This Lambda function simulates the ability for a user to add a note to the application. Notice however it does not take in any unique user information. Instead, it uses the token that is passed to the Lambda to look at the JWT claims and use the email from the collection of claims. Line 17, uses the Python JWT library called Jose to look at the claims. Claims looks like:
{'sub': 'd729a720-83a8-4b3e-a46d-c51a38a7a757',
 'email_verified': True,
 'iss': 'https://cognito-idp.us-east-1.amazonaws.com/us-east-1_XEu4cVvtK',
 'cognito:username': 'd729a720-83a8-4b3e-a46d-c51a38a7a757',
 'aud': '3v0e377t1vt69jcrqeo588hlh5',
 'event_id': 'e3d77dc7-82ea-41b1-8567-a66fe9139a8b',
 'token_use': 'id',
 'auth_time': 1583965007,
 'name': 'Ernest T Bass',
 'exp': 1583968607,
 'iat': 1583965007,
 'custom:favorite_band': 'Cotton Eyed Joe',
 'email': 'ernest.t.bass@contbay.com'}
From here we can use the email or the Cognito generated cognito:username as a key into a data store.
Build the Lambda zip with the Github provided script and create a Lambda function.
Once we have the Lambda Function in place we are ready to create the API Gateway in the next section.
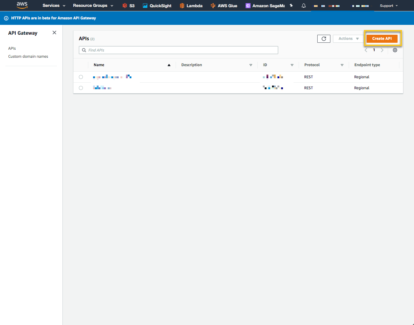
API Gateway Setup
Log into your AWS Console and to the Amazon API Gateway service and select ‘Create API’
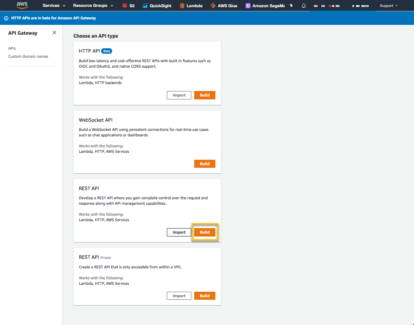
Then select the ‘REST API’->Build
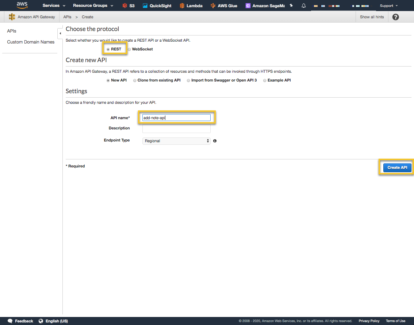
On the next page make sure ‘REST’ is selected and give the API a name.
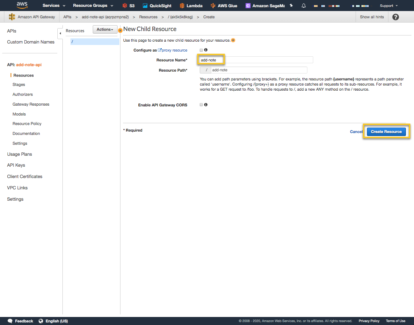
Next go to the ‘Actions’ Menu and select ‘Create Resource’.
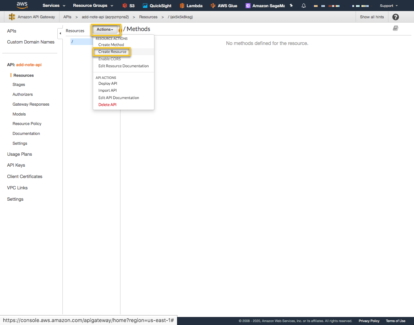
Set the resource name to ‘add-note’ and do not check the ‘Enable API Gateway CORS’.
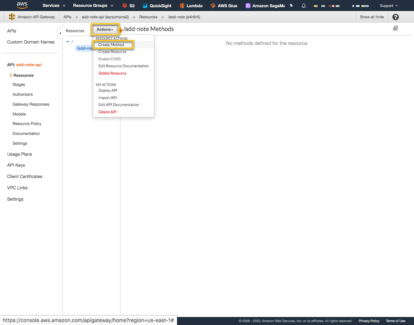
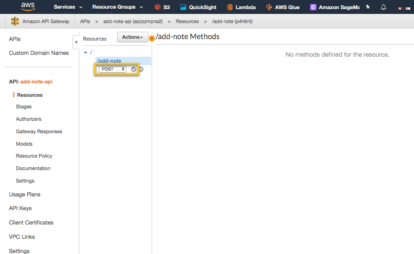
With the resource, ‘add-note’ created, go back to ‘Actions’ and select ‘Create Method’ and then select ‘POST’ in the dropdown and the check next to it to select it.
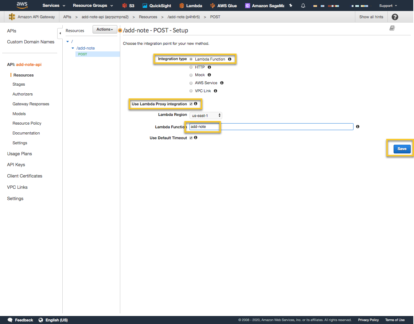
You will then be taken to a page to configure the add-note resource, POST method. The Integration type is going to be Lambda Function. This is why we had to create the Lambda function first, then add the API Gateway. Select ‘Use Lambda Proxy Integration’ so the endpoint Input and Output flow to and from the Lambda. If this is not checked, then API Gateway can perform some pre/post processing of the request. In this case it is not necessary. In the Lambda Function drop down, select the name of the Lambda that you created above. In my case I called it ‘add-note’ and then ‘Save’. When you do, you should see a dialog box asking if it is ok to give API Gateway permission to invoke the Lambda Function. Select ‘Ok’ when you see this dialog.
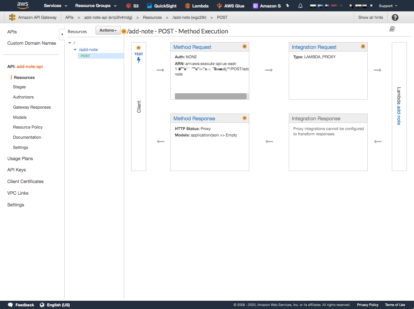
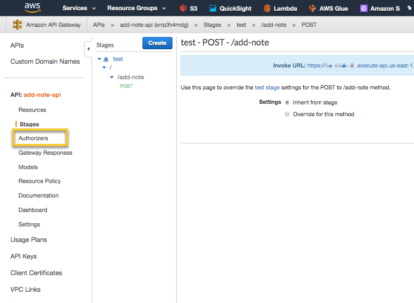
After Save is complete the POST Method Execution page should look like the following:
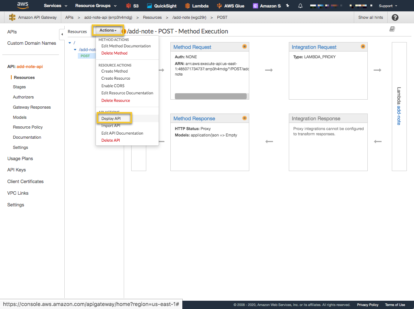
Deploy the API. You can see that we can hit the Lambda function with no Cognito security. At this moment the API is NOT secure by Cognito.
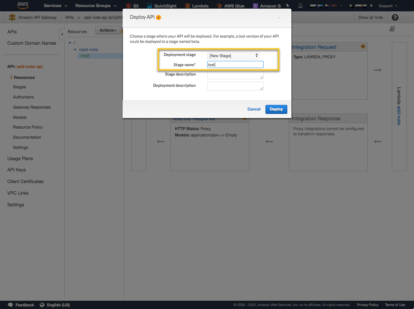
Select [New Stage] and provide a name.
We are now ready to test the unsecured API Gateway. Select ‘Stages’ from the left navigation, then the POST method and copy the URL at the top of the page.

Using a tool like Postman, or PyCharm Http Request tester, let’s hit the endpoint. Hitting the API Gateway endpoint will be forwarded to the Lambda, but the Lambda checks to make sure the event has the expected values – which in this case it will not. We should get an HTTP Status Code of 500, and an error message like: “Error in processing request. event[‘headers’] is missing ‘token’ section”
Let’s secure the API with a Cognito Authorizer. Select ‘Authorizer’ from the left navigation.
Create a new Authorizer.
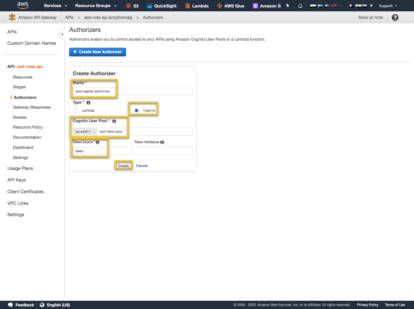
Provide a name for the Authorizer, which will be used later. Select ‘Cognito’ as the Type of Authorizer and then select the Cognito User Pool to use for the Authentication. In the Token Source box, type in a name that will be used in the header to identify which header field will hold the token. This name can be anything but be sure to use the name in the POST request header. Then create the Authorizer.
Test the Authorizer by first logging in with the function provided above and getting the IdToken.
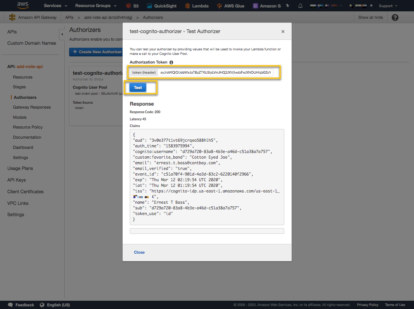
If the test is successful, you should see a response like above. Notice the Claims from the Token. This is the same kind of information that the Lambda is retrieving from the token when the request is forwarded from the API Gateway.
At this point the Authorizer is configured and we are able to test that it does work. Now we need to add it to the API Gateway endpoint so it will use the Authorizer.
Select ‘Resources’ from the left navigation, then ‘POST’ and finally ‘Method Request’.
Select the ‘Edit’ pencil next to Authorization and look for the Cognito Authorizer you just created. If it is not there, refresh the page. It is common to have to refresh the page to see the Authorizer.
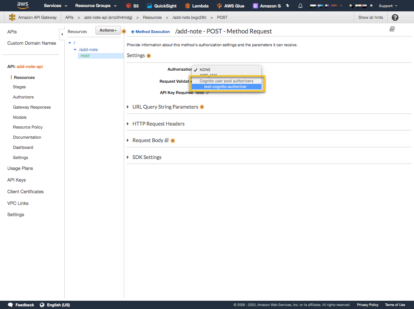
Then select the checkbox next to the drop down to select it.
Lastly, deploy the API to the same Stage as before. Only after the API is deployed with the changes be made.
At this point, the API Gateway endpoint is secured by the Cognito User Pool and is expecting the token to be in the header in a field called, ‘token’. If this is not there, or if the token is invalid for any reason, the request is NOT forwarded to the Lambda function. Let’s try this out using our previous test. This time we would expect it to fail as Unauthorized, and it is.
Now using the token, update the POST request and test it again.
WRAP UP
In this post we focused on how to secure an API Gateway Endpoint with a Cognito User Pool. We wanted used to be able to sign up, confirm the sign up and then login to the application and hit API Gateway endpoints. We used a Python client to exercise this setup, but you can image how we can use a Web Application front end to this same functionality to create a server less web application that will store the notes into a DynamoDB.
Architecting Serverless applications opens up new ways to think about how to create and structure an application. Understanding how to secure API endpoints is a fundamental first step in building secure, scalable solutions.Understanding how to secure API endpoints is a fundamental first step in building secure, scalable solutions.CLICK TO TWEETSPR is a member of the Amazon Partner Network. Learn about our AWS expertise.
SOURCE CODE
Full source code can be found on my Github page.
